Showing posts with label Palette. Show all posts

Tuesday, October 21, 2014

Review and Swatches: Sleek Oh So Special Palette

After a few tutorials, I am coming at you with a review of yet another Sleek palette that my husband spoiled me with the other day. The Oh So Special palette has quite the following online and with it's pink tones is great for very feminine, romantic looks. Let's get to it!


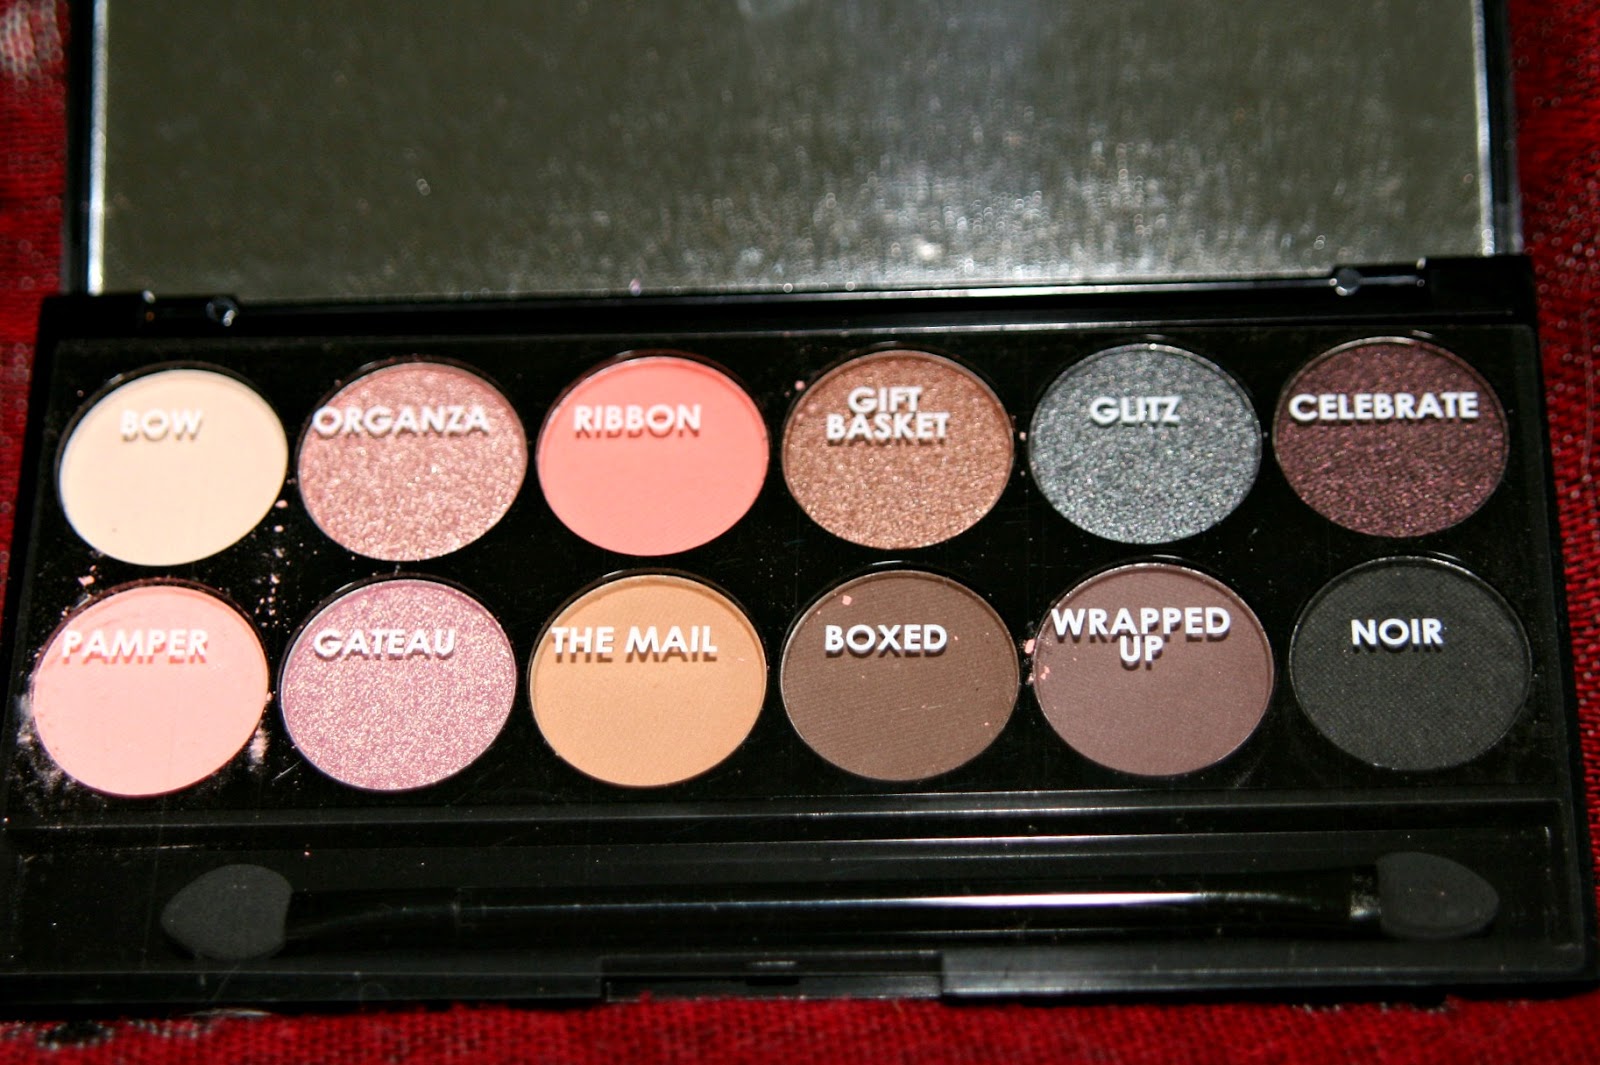

The packaging is as usual very pretty, very "sleek" (See what I did there?!) and classic. The box is covered in the colours you see in the palette itself and the actual palette is a matte black with a shiny relief. The only major downside to Sleek packaging is that it is a BITCH to open and they break fairly easily. But then again, it is a €9.99 eyeshadow palette, can't expect the world from it. As long as the shades are good.


And by golly they are! This palette has a great colour scheme for both a soft, defined eye and even a heavy smokey eye. I am loving the pink, romantic theme of this. It's stunning.

Let's look at the colours!


This palette actually comes with a nice, plastic inlawy that names all the colours, which makes it easy to reference the different colours when decscribing it, I like this!


Bow is a matte, cream-nude tint. Great for highlighting, not so much for swatching. Slightly powdery.

Organza is a very shimmery, almost metallic rose-gold colour.

Ribbon is a matte coral shade. It's a bit smoother than Bow, less powdery.


Gift Basket is a shimmery, golden copper colour. 

Glitz is a metallic, blue gun-metal. 

Celebrate is a shimmery aubergine colour, that in certain lighting almost looks black. It's stunning.


Pamper is a matte, light peachy-pink. Slightly powdery.

Gateau is a light purply.pink with a golden shimmer. It's a yummy looking as it sounds!

The Mail is a matte, light camel colour. Smooth, for a Sleek matte shade.


Boxed is a matte, mid-to-dark tone brown with a slightly warm undertone.

Wrapped Up is a matte, taupe-y aubergine colour. Very smooth, for a matte.

Noir is a slightly misleading shade. It might be called Noir, but it is not a proper black colour. It's more of a very deep, dark, matte charcoal. Beautiful colour, none the less.


I noticed that on the back of the box, Sleek provide you with tips on how to apply the eyeshadows, just in case you have doubts. This doesn't really apply to me, personally, but I can imagine that it is helpful to people just starting out with using makeup.


Conclusion: I like this palette a lot. If you're considering getting one of the Sleek palettes, I would advise this, if you're not just looking for browns, but maybe a bit more colour while still keeping it neutral. It is not a dupe in any way for the Naked 3 palette, but if you like a bit of pink, getting this palette surely is a cheaper option! It provides a (matte) highlighter, and several matte crease colours, I am very happy with this palette.


Pros:

  • Pricepoint, at €9.99 for 12 colours, there is really no faulting these palettes.

  • More matte shades than we normally see in these types of palettes, I like!

  • Shadows are well pigmented and easily blended (save a few of the mattes).

  • Availability! Sleek is finally available in stores here, they are sold in select V&D warehouses, and luckily one of those in my city, Dordrecht.

Cons:

  • I am having a bit of a hard time finding some, but I guess I wouldn't mind a shimmery highlight for the inner corner.

  • Packaging is hell to open and can easily break a nail or three in process.

  • Some of the matte shades can be a bit tricky to blend, but it's not really the end of the world, just takes a bit more work.


Do you own any Sleek palettes? Other Sleek products? What are your thoughts on them? Let me know down below!


Thank you for reading and until next time!

XXX

Friday, October 17, 2014

Tutorial: Realistic Jessica Rabbit for Halloween

GASP! It's another Halloween post, what is this?! I guess I got a little into it. Let's jump right in!


For a perfect base I applied two layers of foundation, I mixed my Facefinity in Light Ivory and my All Matt Plus in Light Beige. Jessica being a cartoon AND a performer, you kind of need to go all out with your base. I concealed my face using Maybelline Fit Me Concealer in 10 and concealed/highlighted under my eyes using Maybelline Dream Lumi Touch concealer in 01. It's a lot, I know. But she's a performer and needs to have her face beat to perfection at all times. I blended in all my cream/liquid products using a Real Techniques Mirace Complexion Sponge. I also set everything with my translucent powder, using the sponge. When performing on stage, you need that face to stay matte!


Jessica, as seen in the movie Who Framed Roger Rabbit, has a very high, rounded brow, with a very 20's feel to it. I opted for a bit more of a realistic look and just went with my natural shape. I filled them in with Naked 2 from the Urban Decay Naked Basics palette and set them with a tinted brow gel.


I primed my eyes using Too Faced Shadow Insurance and then to help add dimension to the eyelook I highlighted the inner corner of my eyes using NYX Jumbo Eye Pencil in milk and on the lid itself I blended Urban Decay 24/7 eye pencil in Riot. It looks messy, but that's fine as it's just a base for the rest. It won't show, promise!


If you are familiar with the work of Mrs. Rabbit, you will know that she loves her some purple eyeshadow and I felt that this bright, metallic lavender shade from the Urban Decay Vice 2 palette was spot on. It has the shimmer that will look amazing in the spotlight on stage and I just think it's a pretty colour. I applied the colour Betrayal all over my mobile lid with a flat paddle-shaped brush.


I blended out my crease using this purple-mauve shade from my big Boozy Cosmetics p117 palette and a large, fluffy blending brush. It just helps create some dimension and give a little more smooth transition. You could leave the eyeshadow here, but we all know I am not going to.


With a pencil brush and the colour Voodoo from the Vice 2 palette I intensified the outer corner of the eye and the lower lashline. This colour is a bit tricky, beware of fall-out, I know I had a lot. But it's so pretty and sparkly, which again is something that looks great on stage.


I highlighted my inner corners with this light, shimmery lavender shade from my MUA Pretty Pastels palette, it seemed appropriate for the look.

Now this eyeshadow is obviously not EXACTLY as Jessica has it in the movie, but it's my take on how it would look in reality.


I lined my upper lashline and my waterline using my Essence Long Lasting Eye Pencil in Black Fever and blended it out with Urban Decays Crave from my Naked Basics palette.


Apply copious amounts of mascara and preferably falsies if you have them available. The bigger the better, she is a diva after all!


To finish off the face I contoured using NYX Blush in Taupe with a Real Techniques Setting Brush, NYX Blush in Peach with a Real Techniques Blush Brush and Dior Shimmer Powder in Rose Diamon and a Real Techniques Setting Brush. I also highlighted the bridge of my nose, my cupids bow (the top of my upper lip) and my browbone using the Shimmer Powder.


We all know Jessica likes her red lip, so to achieve the look I see on her in the movie I lined my lips with MAC Cherry Lip Liner and filled them in completely. I also overdrew my lips a little, for a bit more va-va-vavoom. I then filled my lips in using Rimmel Apocalips in Big Bang. Again with the lips you could go more for the heart-shaped lip she has in the movie, but I wanted to keep it realistic looking.


"I'm not bad. I'm just drawn that way."

"Why don't you do right, like some other men do?"

This is just my take on the makeup I think this over-the-top diva would wear in real life. To finish this off for a Halloween party, pair with a slinky red dress, purple gloves the sparkliest heels you can find! And obviously a a bright red, big and bouncy wig.


Thank you for reading and until next time!


XXX


Monday, September 22, 2014

Tutorial: Dark smokey eye using the Urban Decay Vice 2 Palette

I realised that I had never gotten around to doing a tutorial with the Urban Decay Vice 2 Palette. The options are plentiful, but for today I went with a dark, satin smokey eye. I will most likely do some more with this palette, as the colours are very appropriate for fall.


Naked face alert! My skin is sort of behaving at the moment, so I didn't mind putting up a naked face picture. You can tell I have some hyper-pigmentation and some overall redness going on. Not to mention blotchiness and small impurities throughout. Oh well, that's what makeup is for!


Today we will start off a bit differently than I normally do my makeup, as we will be working with dark colours. I did my brows using a Catrice Eyebrow Pencil in Date With Ashton and Urban Decays Buck eyeshadow, from the first Naked Palette. I primed my eyelids with Urban Decay Eyeshadow Primer Potioin in Eden.


Seeing as the eyeshadow will be very dark and intense, I started off doing my eyes first. I applied Nyx Jumbo Eye Pencil in Dark Brown along my upper and lower lashline and blended it out with my finger. This helps create a dark base for the eyeshadow to layer upon, helping to create an even darker and more intense look.


I applied Habit from the Vice 2 palette with a fluffy blending brush throughout the socket of my eye and all the way up around my orbital bone. This helped warm up the skin a little and obviously also will help me blend out the darker colours. And we all know that blending is key!


I then went on to apply Rewind from the same palette with a slightly less fluffy blending brush throughout my crease, working down towards the lid. This is once again to help transition from dark to light. Always start with the lighter colours and work to dark and not the other way around, you will just end up with a messy un-blended mess on your eyes.


With a flat shader brush I applied Smokeout from Vice 2 on my entire moving lid. Make sure you apply, blend, apply and blend until you have to look/finish/blend that you want. But layers are certainly key, as well as blending.


Then it was time for foundation. Before applying my foundation I made sure to clean up under my eyes using a makeup wipe, as there was a little fall out. And this is exactly why I did my eyes first, dark eyeshadow is a BITCH to correct. The foundation I used was Catrice All Matt Plus 010 Light Beige. I applied this with a damp Real Techniques Miracle Complexion Sponge. This is, for me, a step up from the Beauty Blender, and it only costs a fourth of the Beauty Blender!


Apply concealer where needed! I used a mix of Maybelline Fit Me Concealer in 10 and Maybelline Dream Lumi Touch Concealer in 01. For blemishes and redness I only used the Fit Me and for everything else I mixed them on the back of my hand, applied them with the Fit Me applicator and blended everything in using the sponge I used for my foundation. After finishing the blending of the concealer, I applied Smokeout to my lower lashline and lightly blended it using Rewind.


For contouring I used Nyx Powder Blush in Taupe. I applied this underneath my cheekbones, underneath my chin and along my jawline with a Real Techniques Setting Brush. To warm up the skin, I applied my The Body Shop Honey Bronze Bronzer in 02 along my forehead, on my temples, under my cheek bones and along my jawline. I did countour a bit heavier than I normally do today, as I figured this is very much an evening look. I also applied Urban Decay 24/7 Eyeliner in Black Market to my upper and lower waterline.


Along my cheekbones I applied Nyx Powder Blush in Peach with the Real Techniques Blush Brush.


To finish off the skin I applied my MAC Mineralize Skinfinish in Soft and Gentle on the tops of my cheekbones and on the inner corners of my eyes with the Real Techniques Setting Brush.


For my lips I used the new Maybelline Colour Drama Intense Velvet Lip Pencil in 630 Nude Perfection. (PHEW, what a mouthful!) These are a beautiful, smooth, matte formula. Check them out of you love a matte lip.


To finish off the eyes, I curled my lashes using my Tweezerman Lash Curlers and applied a generous amount of Maybelline The Rocket Volum' Express Waterproof Mascara. If using this for a special event or a night out, I would certainly pair this with some voluminous false lashes.


The finished result! I powdered my face off using the Essence Stay Matte Translucent Powder. This look is a little out of my comfort zone, but I do think I need to start wearing darker eye-looks more often. I like it! This might very well be the makeup I wear when I go to a Poets of the Fall concert next month.

I hope you enjoyed this tutorial, if you have any specific types of looks you'd like me to do, let me know!

Thank you for reading.

XXX