Monday, November 5, 2012

Review and swatches: Sleek i-Divine Storm Pallette

The Sleek i-Divine Pallettes have been popular for a few years in beauty-land, renown for their good quality, high pigmentation and being very budget-proof. As of yesterday(Thanks to my lovely husband!), I finally own one of these wonderful pallettes and I decided it needed a blog-post!


Let's get down to it. The pallette comes in a cardboard casing, as seen above. It looks and feels very high quality. The pallette itself is about the size of my hand ( I have freakishly large hands for a woman, I might have to add).


The palette itself is matte black with Sleek MakeUP written in a highshine stencil. It, again, looks and feels high quality. The only downside for me, is that it's darn hard to open, almost broke a nail on it. But I reckon that means it'll travel well, and not open while you're on your way.


The pallette contains a nice variety of colours, both for everyday but also for evening looks, smokey looks and even ones with colour. The majority of the pallette is high shimmer with three matte colours. It also comes with a duo tipped sponge applicator (I usually just toss these) and a very large mirror, covering the entire lid of the pallette. I love big mirrors as it makes pallettes so much easier to travel with, not having to pack a seperate mirror.


As the shadows in this pallette are not named, I decided to number them so we all know which shade I'm talking about in the swatches.


Shade 1 is a high shimmer champagne with a slightly orange undertone.
Shade 2 is a muted silver with a slightly pink undertone.


Shade 3 is a matte, light brown with a tinge of red.
Shade 4 is a high shimmer beige-gold.


Shade 5 is a high shimmer pink, with a warm undertone.
Shade 6 is a high shimmer cranberry.


Shade 7 is a deep warm bronze, with a lot of shimmer.
Shade 8 is metallic grey / a gunmetal.


Shade 9 is a deep forest green, bordering on being a dark teal.
Shade 10 is a high shimmer, deep blue. (The flash washed it out a little, it's very intense!)


Shade 11 is a matte, warm, dark brown.
Shade 12 is a matte black, not jetblack, but it's better than most matte blacks you can find out there.


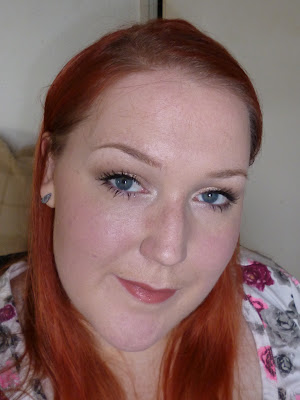
To accompany this review and to prove the versatility for this pallette, I played around with the shadows a bit. First I did a neutral/everyday/work look:


I only used the Storm Pallette for this, even for my eyebrows. I'll break the look down, below:

In my inner corner I applied Shade 2 as a highlighter.
All over my moving eyelid I applied Shade 1 with a firm shader brush.
In my crease and on my lower lashline I blended Shade 11 for definition.
Above my crease colour, I blended in Shade 3 for a seamless transition.
As eyeliner I used Shade 12 on an angled eyeliner brush and just smudged it along my lashline.
On my brows I used a mix of Shade 3 and Shade 11. These are warm shades, so I would only recommend this to people with red hair, or hints of red in their hair.


To prove the versatility of the pallette I decided to try and take the first look and turn into an evening/dramatic look:


I applied Shade 9 on the outer 2/3 of my moving eyelid and blended it into the crease and also made sure it blended nicely into the shade I already had on my lid.
On my lower lashline I applied Shade 7 with a smudger brush for a little more definition.


This pallette is a very complete package, with everything needed for day-time, evening, and even if you feel like a splash of colour! I highly recommend this particular pallette, but also the other Sleek i-Divine Pallettes. The shimmery shadows have a very nice consistence, very buttery and almost creamy. The matte ones need a bit more work to blend, but this is practically the case with all matte shadows, from any brand.


Pros:
  • Good colour selection.
  • They blend well.
  • Pricepoint. (€9.99)
  • It even includes a decent brow option.


Cons:
  • Availability. In Holland Sleek is usually only available in webshops. (Currently, Sephora has two of the pallettes in stores for Christmas. In some countries it's available in stores.)
  • The packaging is hard to open, but this could also be a pro, considering how much easier that would make travelling with it.


Conclusion:

I'm a new Sleek fan. I will most certainly aquire more of these very budget friendly pallettes in the future, and if you're a make-up addict like myself, I'll advise you try them out. It's great shade selection, without breaking the bank, and would also make a great christmas present if you know any make-up addicts!

Have you used any Sleek products? Would you like to? Let me know in the comment section below.

Thank you for taking the time to read my blog!


Sunday, October 14, 2012

Work apropriate: Brown smokey eye and colourful lip!

Time for a step-by-step tutorial!

I start with moisturizing and priming my face and eyes!


For primer I used Smashbox Photofinish and my eyeprimer is as always Too Faced Shadow Insurance.


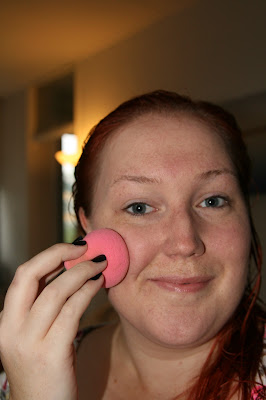
I then applied a thin layer of foundation, using a beautyblender-sponge. For foundation I used three different kinds, all mixed together for the perfect color and finish.


Then I concealed my dark-circles. They are the bane of my existence and have been for many years. They can get very dark and very purple. My undereye concealer of choice is the Maybelline Eraser Eye.


To define my brows I used my Catrice Brow Pencil and Urban Decay "Buck" eyeshadow. I've recently switched up how I do my brows, since I've dyed my hair red, needed to add some warmth to them.


At first I defined my crease only using "Naked" eyeshadow from my Urban Decay Naked Pallette, but I felt like it wasn't defined enough, so I decided to add "Buck" as well.


Buck is a warm mid-tone brown, which is a great option for the crease, and since my lid color would be a cool tone, I figured a warm crease would be a good option.


For my lid I wanted a dark, cool brown, so I first started out with Maybellines Color Tattoo in "Permanent Taupe". I have a few of these cream eyeshadows and I adore them! They can be used as bases or worn on their own, they do NOT budge once they've set on the skin.


To get the smokey look I wanted, I topped the Color Tattoo off with a brown Inglot shade, from my Freedom System pallette.


 I blended this onto the lid, slightly into the crease and on my lower lashline for extra definition.


I smudged a soft black kohl eyeliner onto my lash line and blended that in with a dark-brown eyeshadow. (I didn't manage to get a separate pic of this, sorry ladies!)


I curled my lashes, added mascara and a light, flesh-toned liner to my lower waterline. I rarely use dark liners on my lower waterline, they smudge too much and tend to get stuck on my lenses.


That's our eyes done! Moving on to the rest of the face!


I always start doing my cheeks with contouring. Contouring means that you strategically apply a dark blush/shade/bronzer to places of the face you want to slim down. I always do my temples, under my cheekbones and along my jaw-line. 


I then apply my blush of choice for the day, and a shimmery highlight right above the cheekbones, which I also place on the very highest point of my brow for a slight touch of shimmer. My blush here was NYX "Peach" and my highlighter was Dior "Rose Diamond".


Our lipstick for today is from the new Rimmel Kate Moss Collection, Velvet Touch. The shade I am using is 107, a completely matte berry/wine color. It's a very intense and pigmented color to wear full on, but what I did today was just apply to the middle of my lips and blend it out with my finger. This gives the look of a lipstain instead of a lipstick. A very good way to wear bright/dark colors to work, school, college, you name it.


And the finished result! A work/school apropriate smokey eye and a very colorful lip! I hope you all enjoyed this, thank you for reading and let me know your thoughts in the comments below!


Thursday, October 11, 2012

Favorites of the moment!


Thought I’d make a post about which products are my favorites at this point in time. Often you’ll see them done each month on blogs, but that’s not a commitment I’m ready to make yet!


First up is a scent: Kruidvat Master Perfumer in Amber No. 53. It’s a fresh but fruity scent and most of all very feminine. It’s a very easy scent to wear, perfect for work/school/every day. It being extremely cheap does help a lot too; this bottle is 50ml and costs € 7.99 at Kruidvat. (Dutch Drugstore. And my former employer!)

MAC Fix+ which many beauty freaks will recognize. I use this to set my make-up, to make a foundation brush damp before application, to wet eye shadows before I use them for more intense color. This baby does it all! MAC Fix+ is available at all MAC counters and online retailers and costs €16.50.

Elizabeth Arden 8hour Cream. This is a beauty legend and has been in the game for many, many years. I use this for dry, chapped lips and any dry patches of skin. Been using this a lot lately, must be the season! I bought this travel size at Kruidvat for €4.99


Chanel Vitalumiere Aqua in 22 Beige Rose. The formula of this is amazing, very light but gives plenty of coverage (for me at least.) .  The color of this is too pink for me so I mix it with the other foundation. Available at Chanel counters and luxury beauty stores, €41.18

Catrice Photo Finish Liquid Foundation 18h in 010 Sand Beige. This is a tried and true favorite of mine, but slightly too yellow for my skin, which is why I mix it with the Chanel. It’s fairly long-lasting, and great on normal/combo skin. Available at Kruidvat, € 5.99


Catrice Liquid Liner Waterproof in 010 Don’t Leave Me. This is a great fluid liner, very black and does NOT budge until you remove it with waterproof make-up remover.  Available at Kruidvat, €3.75

MAC Chromographic Pencil in NC15/NW20. I use this on my lower waterline for a more “awake” look, practically every day. It’s more natural looking than a stark white and dark liner on my waterline tends to make my eyes look small. Only available at MAC Pro stores, €17.00


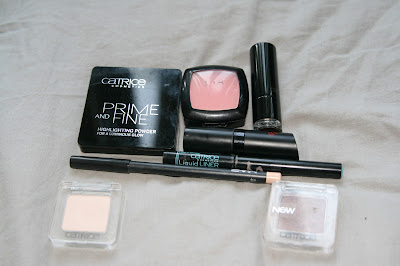
Catrice Absolute Eye Color Mono in Bring Me Frosted Cake and My First Copperware Party.  Bring Me Frosted Cake is a very light pink, almost white, which makes for either a good eyelid base shadow or highlight. It’s completely matte. My First Copperware Party is almost identical to MAC’s Satin Taupe, a cult favorite in the beauty community, and is a great all over shade for the lid or the crease. It looks great on all skin tones and eye colors. Available at Kruidvat, €2.79


Accidentally swatched these opposite of the first picture and BMFC barely shows up, but then again it IS a highlighter.

Catrice Prime and Fine Highlighting Powder. This is a gorgeous pinky-gold, very subtle highlight. It’s great for cheekbones, inner corner or brow highlighting due to being so subtle it’s also good for daytime without being too shimmery. Available at Kruidvat, €4.49

NYX Blush in 06 Peach. A very pretty, natural blushing color on me. It can be very subtle or prominent, depending on application. Goes with everything! Bought this online for €6.66


Rimmel Kate Lasting Finish Lipstick in 01. A very beautiful deep, true red color. I don’t often wear this full on, but tend to apply very little in the center of my lips and then dab it out with my fingers for a nice stained “just bitten” look.  Available at all drugstores around the world that carry Rimmel, €9.49

Catrice Ultimate Color Lipstick in 160 Tell me a Berry-Tale. A very intense berry-plum color which looks beautiful when worn full on, or as a stain. I’m a big fan of this for fall/winter! Available at Kruidvat, €3.99


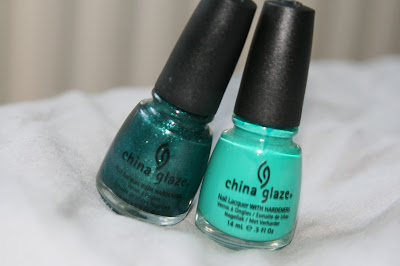
Lastly there are two polishes I’ve been wearing non-stop since I got them and they are both China Glaze. First up is Watermelon Rind which is a beautiful dark teal, with lots of tiny glass flecks in it which makes it a very interesting polish to wear and look at, especially in sun light. The other is Four Leaf Clover which is a bright teal/green crème finish. Not exactly what you’d expect for fall as it is practically neon, but I love how happy and bubbly it looks, so I wear it a lot! I’ll probably switch over to burgundy, reds and grays soon enough! My husband bought these for me online. China Glaze retails for €5.95.


That’s it for now, thank you for stopping by and thank you for reading! Let me know your favorites in the comments below! 

Sunday, September 16, 2012

Review and swatches: Urban Decay Naked Palette (1)

The Urban Decay Naked Palette has been the talk of the (beauty) town ever since it first came out, and as any other make-addicted girl I went nuts when I heard it was coming to Sephora in Holland. I called the closest Sephora and had them put one aside for me, which was then given to me as a birthday present from my husband in the summer of '11.

The packaging is made of a suede-like fabric, which is pretty for... About 5 minutes. It attracts dirt like a magnet and the printed letters on mine have faded over time, as you would expect from print on fabric.


When I got the palette it came with a miniature Urban Decay Primer Potion, which is a very popular eyeprimer, but I still prefer my Too Faced Shadow Insurance. It also came with a very firm, flat, synthetic shader brush which is a fine brush, although I don't like to use it with powder shadows, I use it with creme shadows instead.


What can I say about this baby? Mostly good things I reckon, although I would have wished there had been one or two more matte colours, especially a matte highlighter. The packaging also feels a little too flimsy, especially compared to the Naked 2 Palette. (which I unfortunately don't own. Yet.) The shadows blend amazingly and most of the shades without hardly any fallout. Only Sidecar tends to have a lot, only the glittery bits though.


L-R: Virgin, Sin, Naked, Sidecar, Buck, Half-Baked


Virgin is a very light pink, slightly shimmery highligter. (Barely visible on the photo.)
Sin is a shimmery, metallic pink.
Naked is a light brown, sandy color, which is one of the two matte shadows in the palette.
Sidecar is a metallic bronze with tiny glitters in it. (Can cause fallout underneath the eyes during the day.)
Buck is a warm, matte brown. 
Half-Baked is a metallic, shimmery orange based gold.


L-R: Smog, Darkhorse, Toasted, Hustle, Creep, Gunmetal.


Smog  is a metallic, shimmery coppery-brown.
Darkhorse is a shimmery, warm dark brown.
Toasted  is a shimmery, metallic mauve. 
Hustle is a purple-based brown, with rose-gold shimmer.
Creep is a matte, dark grey(almost black) with silvery blue glitters.
Gunmetal is a metallic grey, with silvery-blue shimmer.

I'd say this is a very well-rounded palette, that can be good for anything from a light, neutral look to a dark smokey/bronze look. I get the hype about this palette, the quality is amazing and the shadows blend seamlessly. Obviously this also leads me DYING to try the Naked 2 Palette, which is now finally in stores in Holland.

Pros:

  • Amazing colour pay-off
  • The shadows blend like a dream
  • You can create a lot of different looks with this palette, whether you're a neutral kinda gal or you like your heavy smokey eyes.
  • I've used mine a LOT and yet I've not hit pan on a single colour, they last for a long time.


Cons
  • Personally I think it could use another matte shadow or two.
  • Only for sale at Sephora (and international web-stores)
  • Price could be an issue for some, personally I don't think €50 is THAT much for the amount of shadows and quality you get. I feel you get a good bang for your buck.


Conclusion: I love my pallette, and would advise anybody who puts some effort into their make-up to either get it, or maybe ask for it for a birthday or Christmas.

If anybody reading this has this palette or maybe want me to show looks on the blog using this palette, let me know in the comments.

Thank you for reading!